9 Steps to Program Garage Door Opener in Car Without Remote

If you started by Googling this question, you’ll probably be disappointed. Why? Because the first few page results give you this unhelpful answer: you can’t. And it makes sense. On many appliances that are operated by remote, the main device has on and off switches. The finer functions are on the remote controller, so you can’t work your device without it.
In the case of a garage door opener, it may be a matter of language. That’s why – for our demo – we’re focusing on garage opener keypads and garage opener buttons. The former lies somewhere in your house. The keypad might be mounted in the kitchen, next to the door that leads to the garage. Or it might be installed near the garage door, either inside or outside the building.
The other option features car-based controls. These buttons are often on the inside of your car roof, the dashboard, or the rearview mirror. Their general controls are similar, but the buttons have to be synchronized to your specific garage door. Some cars have multiple buttons on the control panel, so you can use the same garage door opener on multiple garage doors.
How to Program the Garage Door Opener in Your Car Without a Remote
Step 1: Confirm the Type of Controller you’re Using
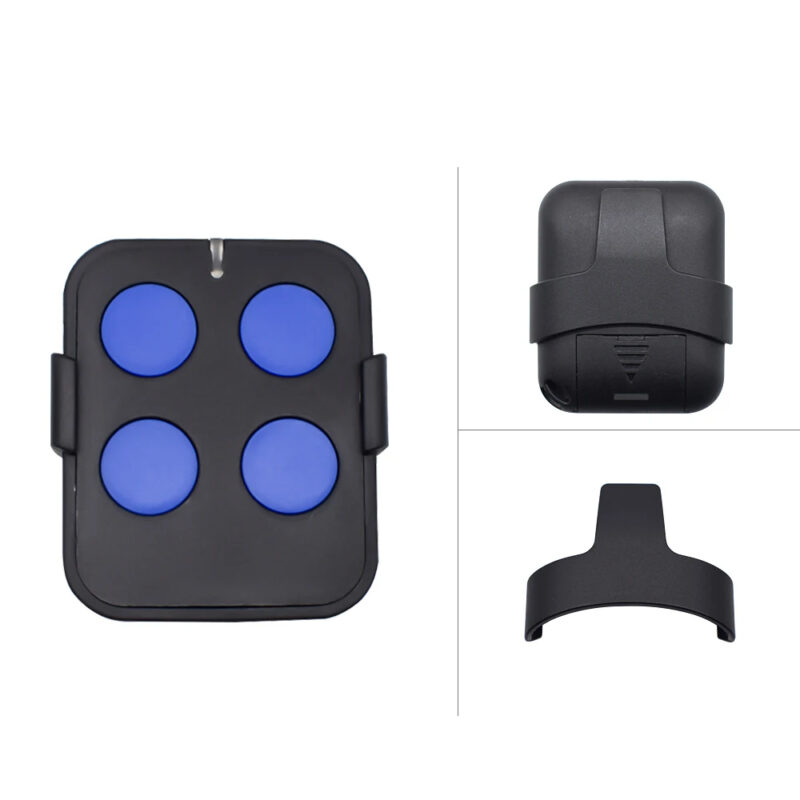
It could be a basic keypad that has a ‘program’ button or a ‘learn’ button. Technically, this keypad is still a remote device. But it’s a stationary keypad that’s mounted on a wall or floor. It can also be installed inside your car for easy access. Apart from the main control button, the keypad has numbered buttons that sometimes have letters of the alphabet on them.
The second type of non-remote keypad mimics the primary control box on your garage door opener. This mini-control-box will often have three or four buttons mounted on your rearview mirror or some other convenient position in your car. It might have LED indicators. Look up your car brand and model online to see the type of garage door opener it comes with.
Step 2: Study the Control Pad for a few minutes
We’re working with a sample that has numbered keys and is mounted on your garage wall or somewhere on your house. Study the control pad to see what the buttons do, how they’re arranged, whether it has indicator lights, and what those lights do. You should also check the instruction manual for key details like safety advice, tips, and tricks.
Whether you’re using a numbered keypad or blank arrows and boxes, the idea is to erase the previous programming and set new parameters. This could be a new four-digit code or a designated button that opens or closes the door. If you’re not sure where the control pad is, check online to see whether your car has one, and where it’s located in the car.
Step 3: Press the Program Button
-
Sale!

Wireless RF 433mhz Garage Door Gate Duplicator 433 Mhz Key Garage Door Opener Remote
Original price was: $8.99.$6.99Current price is: $6.99.Select options This product has multiple variants. The options may be chosen on the product page -
Sale!
TX3 TX4 GTX 4 MT4 MT4V MT4G 433.92MHz Garage Door Opener Remote
Original price was: $14.99.$10.99Current price is: $10.99. -
Sale!
NICE INTI1 INTI2 INTI1Y INTI2Y FLO2RS FLO4RS FLO1RS Garage Door Opener Remote
Original price was: $15.99.$11.99Current price is: $11.99.Select options This product has multiple variants. The options may be chosen on the product page

On some garage door openers, the button is marked ‘program’ or ‘learn’. You’ll find it near the top of the keypad. Press down the button to start your system reset. On the lower end of the keypad, you’ll spot the arrow buttons. On some models, the up-arrow and down-arrow are two separate buttons. On other models, it’s the same button with an ‘up’ side and a ‘down’ side.
Press the arrows and the program button simultaneously and hold them down to flush the system. This could take anything from 3 seconds to 10 seconds, depending on the model that you have. On our sample garage door opener, once the previous settings are erased, the backlights on the keypad will go off, leaving everything on the keypad ‘dark’.
Step 4: Restore the Defaults
Our sample keypad is manufactured by Genie. All their keypads have a default code of ‘357’. So press the program button then press 3, 5, and 7 in order. Once the code is set, the LED on the keypad will flash. Test your programming by pressing 3, 5, 7, enter. Then use the arrow buttons to see if the garage door will respond. This example assumes the keypad is wall-mounted.
If – on the other hand – the keypad is inside your car, you’ll have to test the distance. Park in the driveway and key in the code to see if it works. Then pull back a bit, reversing towards the road or your gate to see how far the range of your garage opener keypad is. This is useful because you want to know how soon you can open the garage door while you’re driving home.
Step 5: Set a New Code
The advantage of default codes is they’re easy to look up. So while the Genie default is 357, other brands have a default of 1234, or 0000. Verify the default on your keypad by Googling it. Then reset it to a code that has meaning for you. Some people go with random numbers and letters, but those are easier to forget. On the other hand, don’t pick something too obvious.
Pro Tip: You know those online games that use trivia to select your pet name, celebrity pseudonym, or drag queen name? It may ask you to ‘Guess your Alien Name. It’s the town you were born in and your first homeroom teacher’. These are phishing schemes designed to guess your passwords, so don’t use something obvious like a birthday or childhood street address.
-
Sale!
304 Stainless Steel Magnetic Door Stopper
Original price was: $18.99.$13.99Current price is: $13.99.Select options This product has multiple variants. The options may be chosen on the product page -
Sale!
Transparent Self Adhesive Door Holder Door Stopper
Original price was: $8.99.$6.99Current price is: $6.99. -
Sale!
Adjustable Strong Magnetic Door stopper
Original price was: $15.99.$11.99Current price is: $11.99.Select options This product has multiple variants. The options may be chosen on the product page

Step 6: Do a Deliberate Replacement
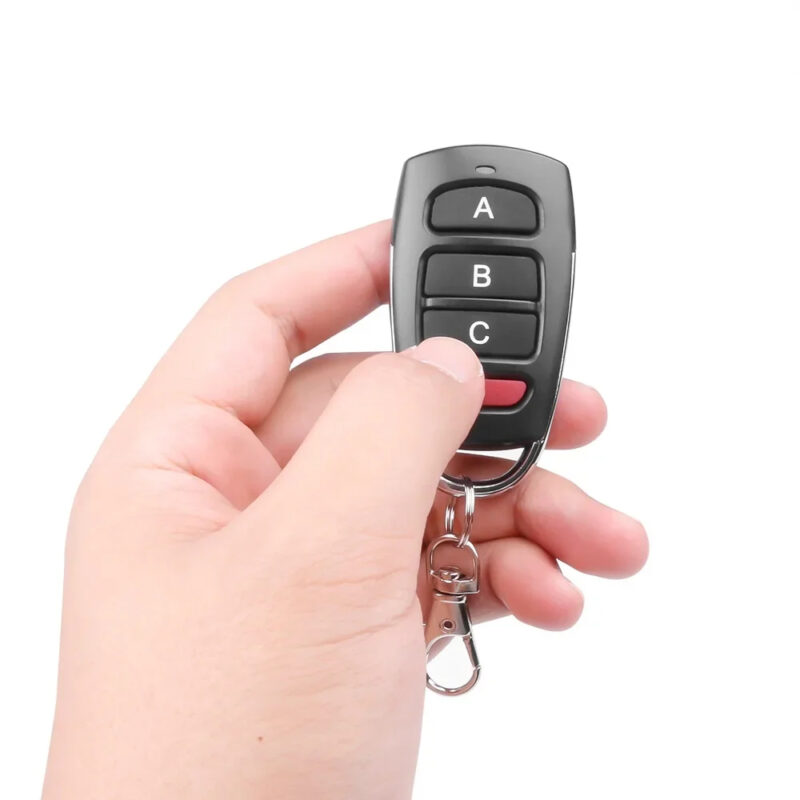
Programing your garage door opener without a remote implies your system never had a remote, to begin with. But you might be reprograming it because you keep losing the remote controller. So it’s not that you don’t have a remote. It’s that you prefer not to use it. In this case, you’ll use the remote controller to program your car buttons. Afterward, the remote becomes redundant.
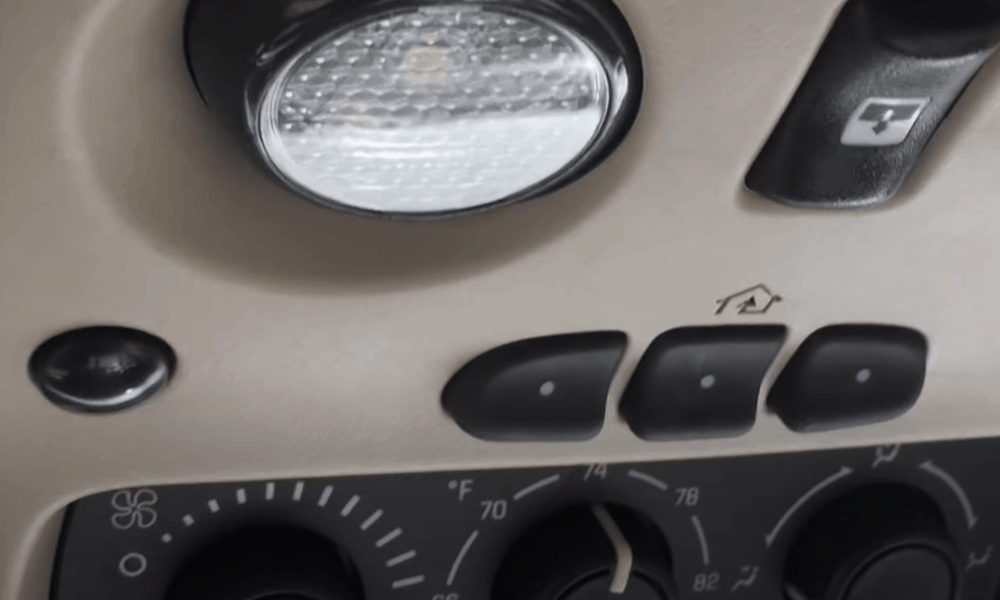
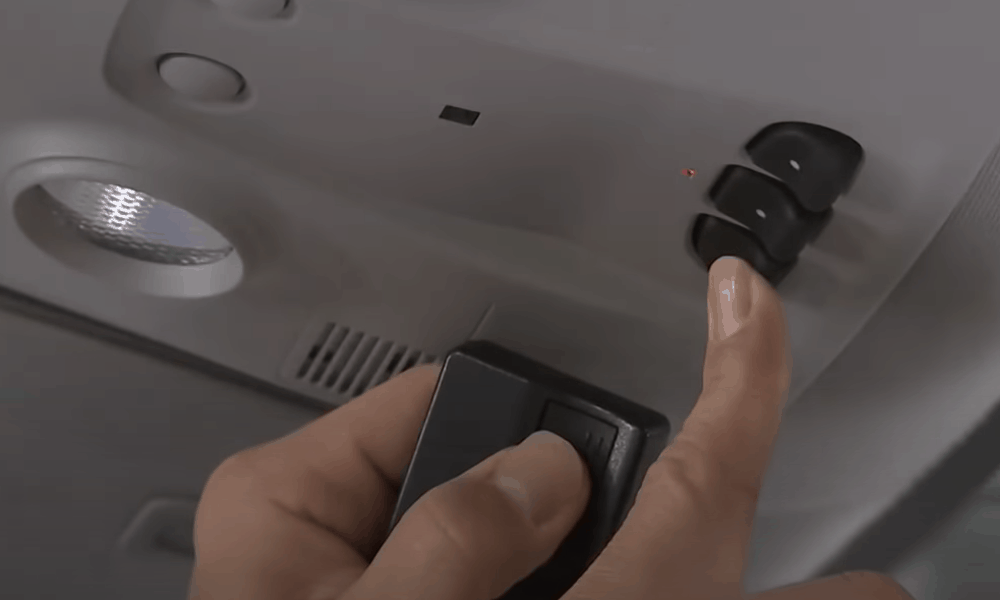
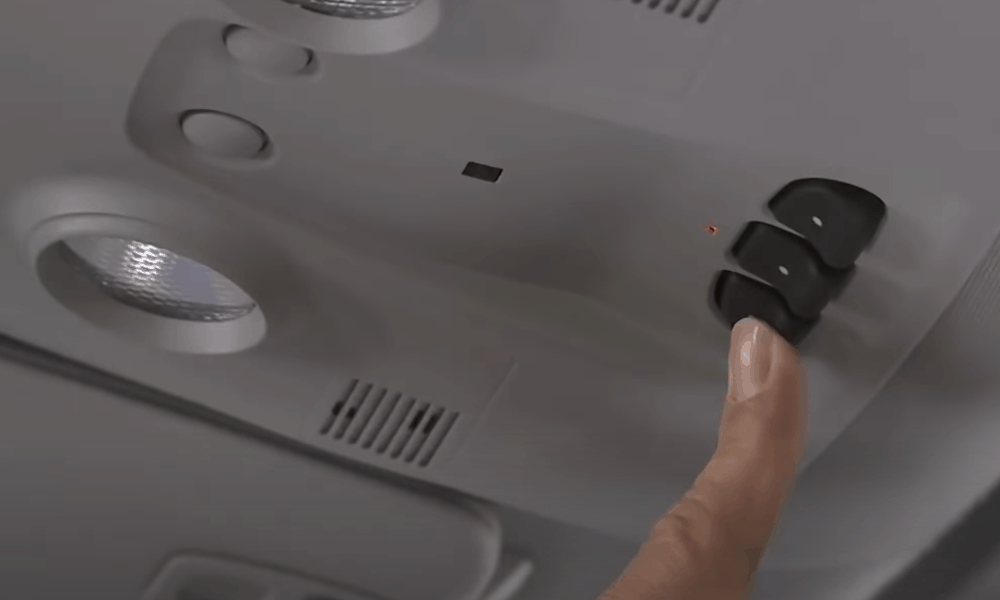
To do this, you need to have your car inside the garage, or within sight of your garage opener control box. Check the car’s inner roof to see what buttons you’re working with. In our example, the Genie set-up has three buttons and a round indicator light. As you start your programming process, you’ll notice the indicator light is off. The light sits above the middle button.
Step 7: Hold Down the Sides
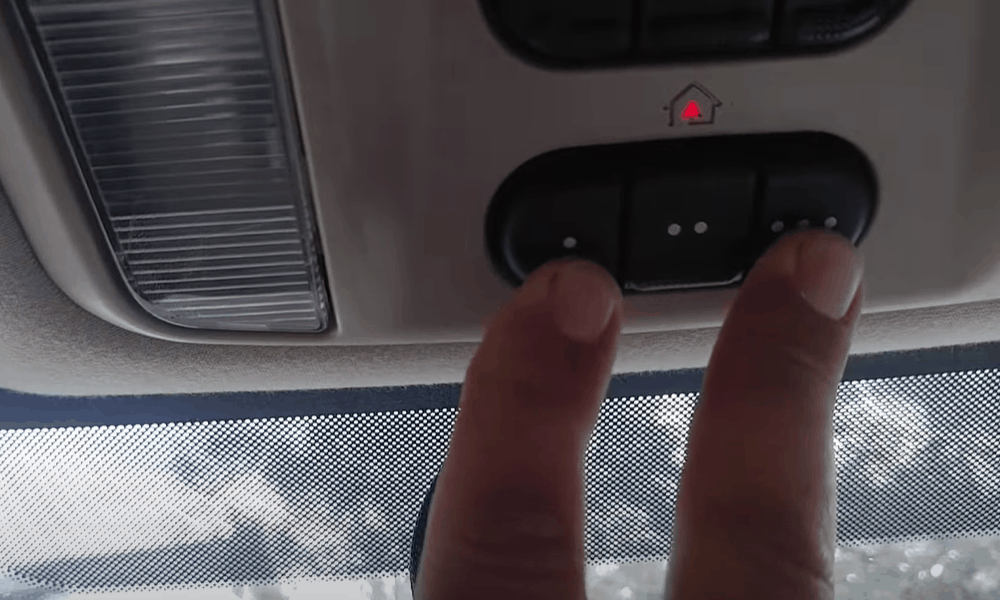
Press the two side buttons simultaneously and hold them down to reset the system. This takes 10 to 20 seconds. As you press, the LED will turn solid red then start to twinkle. Once it begins flashing, let go of the side buttons. On your remote controller, select the button you’d like to replace. Press that button while pointing at the control box, holding it a few inches away.
While pressing the button on the remote controller, press its replacement button on the control box. Hold both buttons until the indicator light starts to blink again. It will blink slowly at first, then it will speed up, flashing faster and closer together. Now let go of both buttons. The light should go off. Press the control button again. It should turn red and stay red until you let go.
Step 8: Go to the Main Source
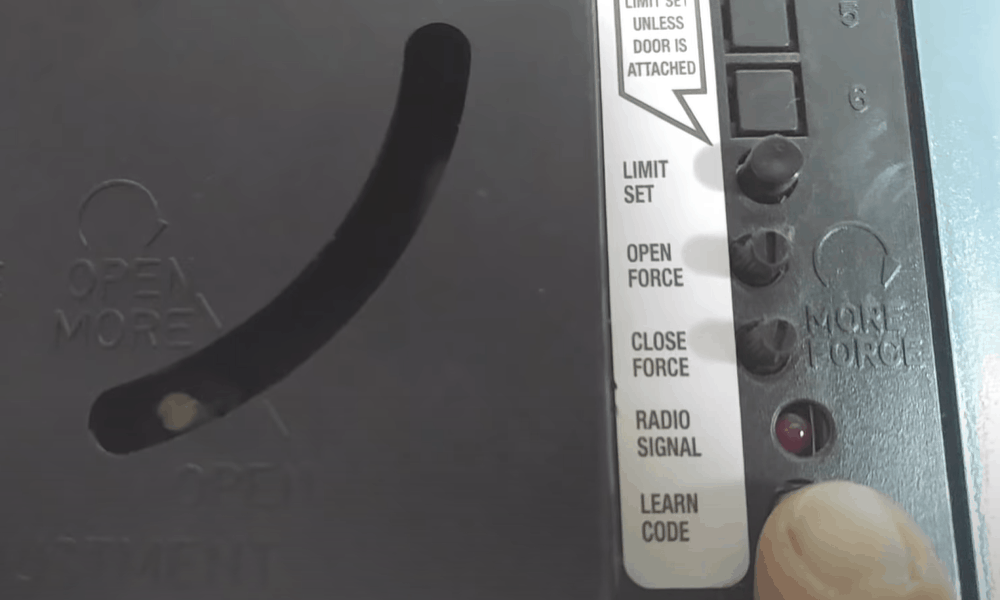
Sometimes, when you press the control box button, the indicator light will blink instead of staying on. This means it hasn’t finished programming itself. Go to the control box inside your garage and look for a button marked ‘learn’, ‘program’, or ‘smart’. Press that button then go back to the car. You have about 30 seconds to finish this step or you’ll have to start from scratch.
Now get back in the car and press the replacement button you’ve just programmed. Hold it down for a second or two. The garage door should open or close in response. If the door doesn’t budge, go back to the main control box and press the ‘learn’ button, then come back to the car and press your programmed button. You may have to repeat this a few times before it takes.
Step 9: Store your Remote Controller Safely
Now that you’ve safely programmed your car buttons to operate the garage door opener, you no longer need your remote transmitter. But you never know when it’ll come in handy, so don’t lose it. We recommend tucking it in the glove box, toolkit, trunk, or another safe location inside your car. You want the remote controller accessible in case your buttons ever get stuck.
-
Sale!
Mini Fingerprint USB Door Lock
Original price was: $27.99.$20.99Current price is: $20.99.Select options This product has multiple variants. The options may be chosen on the product page -
Sale!
Aluminum Alloy Stopper Sliding Door Lock
Original price was: $12.99.$9.99Current price is: $9.99.Select options This product has multiple variants. The options may be chosen on the product page -
Sale!
Button Push Furniture Door Lock
Original price was: $50.99.$38.99Current price is: $38.99.Select options This product has multiple variants. The options may be chosen on the product page
On the other hand, if you’re a multi-car family, the remote controller should be stored inside the house. That way, if your car is ever lost, stolen, or another household member needs to access the garage, they can easily find the remote. Take the batteries out and store them nearby to prevent the batteries from depleting themselves or leaching into your remote’s plastic casing.
Click to Close
You can’t program a garage door opener without a remote controller. But you can use your remote transmitter to reset the garage door opener buttons inside your car. Or you can use an electronic keypad to control the door without a remote.
- For keypads, press the arrow buttons and the program buttons simultaneously. Restore the brand’s default code before selecting your own.
- For control boxes, press the two ‘end buttons’ to clear previous settings. Then use the remote controller to sync your car buttons.
What type of garage door opener do you have? Show us a photo in the comments!